Dependencies
The port-adapter pattern is one of the main concepts of the clean architecture, it is important to understand it to keep your app testable and usable on any device.
The problem
First of all, we have to understand that any interaction the app has with any external dependency should be encapsulated in an adapter. External dependencies are anything outside of our app that are not controlled by it.
For example:
- API
It sends information the app doesn't know, the app can make some GET requests to get API data and display it and make some POST, PUT, DELETE requests to modify it. But an API is usually very complex and it is hard for front-end developers to well understand it and test their code when an API is consumed.
Usually for testing, developers create a complex system of testing with a real API instance using an empty database, or they launch a mock server to fake the data. They can either mock their data with jest but it can be tough to maintain
- Storage
The app in clean architecture should not know on which device it is run, so how can we deal with local device storage? Local storage for React, async storage for React Native, Electron JSON storage for Electron.
- Bluetooth
Even harder, bluetooth libraries are usually a bit complex and not working exactly the same way, almost impossible to test without real devices around and the app on a device launched
- Date
Each time new Date will be called it will send a different result, pretty hard to test too. Moment is deprecated, and it can be a real pain to switch to another lib and getting exactly the same behavior than before
Good new, we have a solution all of those problems thanks to the port-adapter pattern
How it works
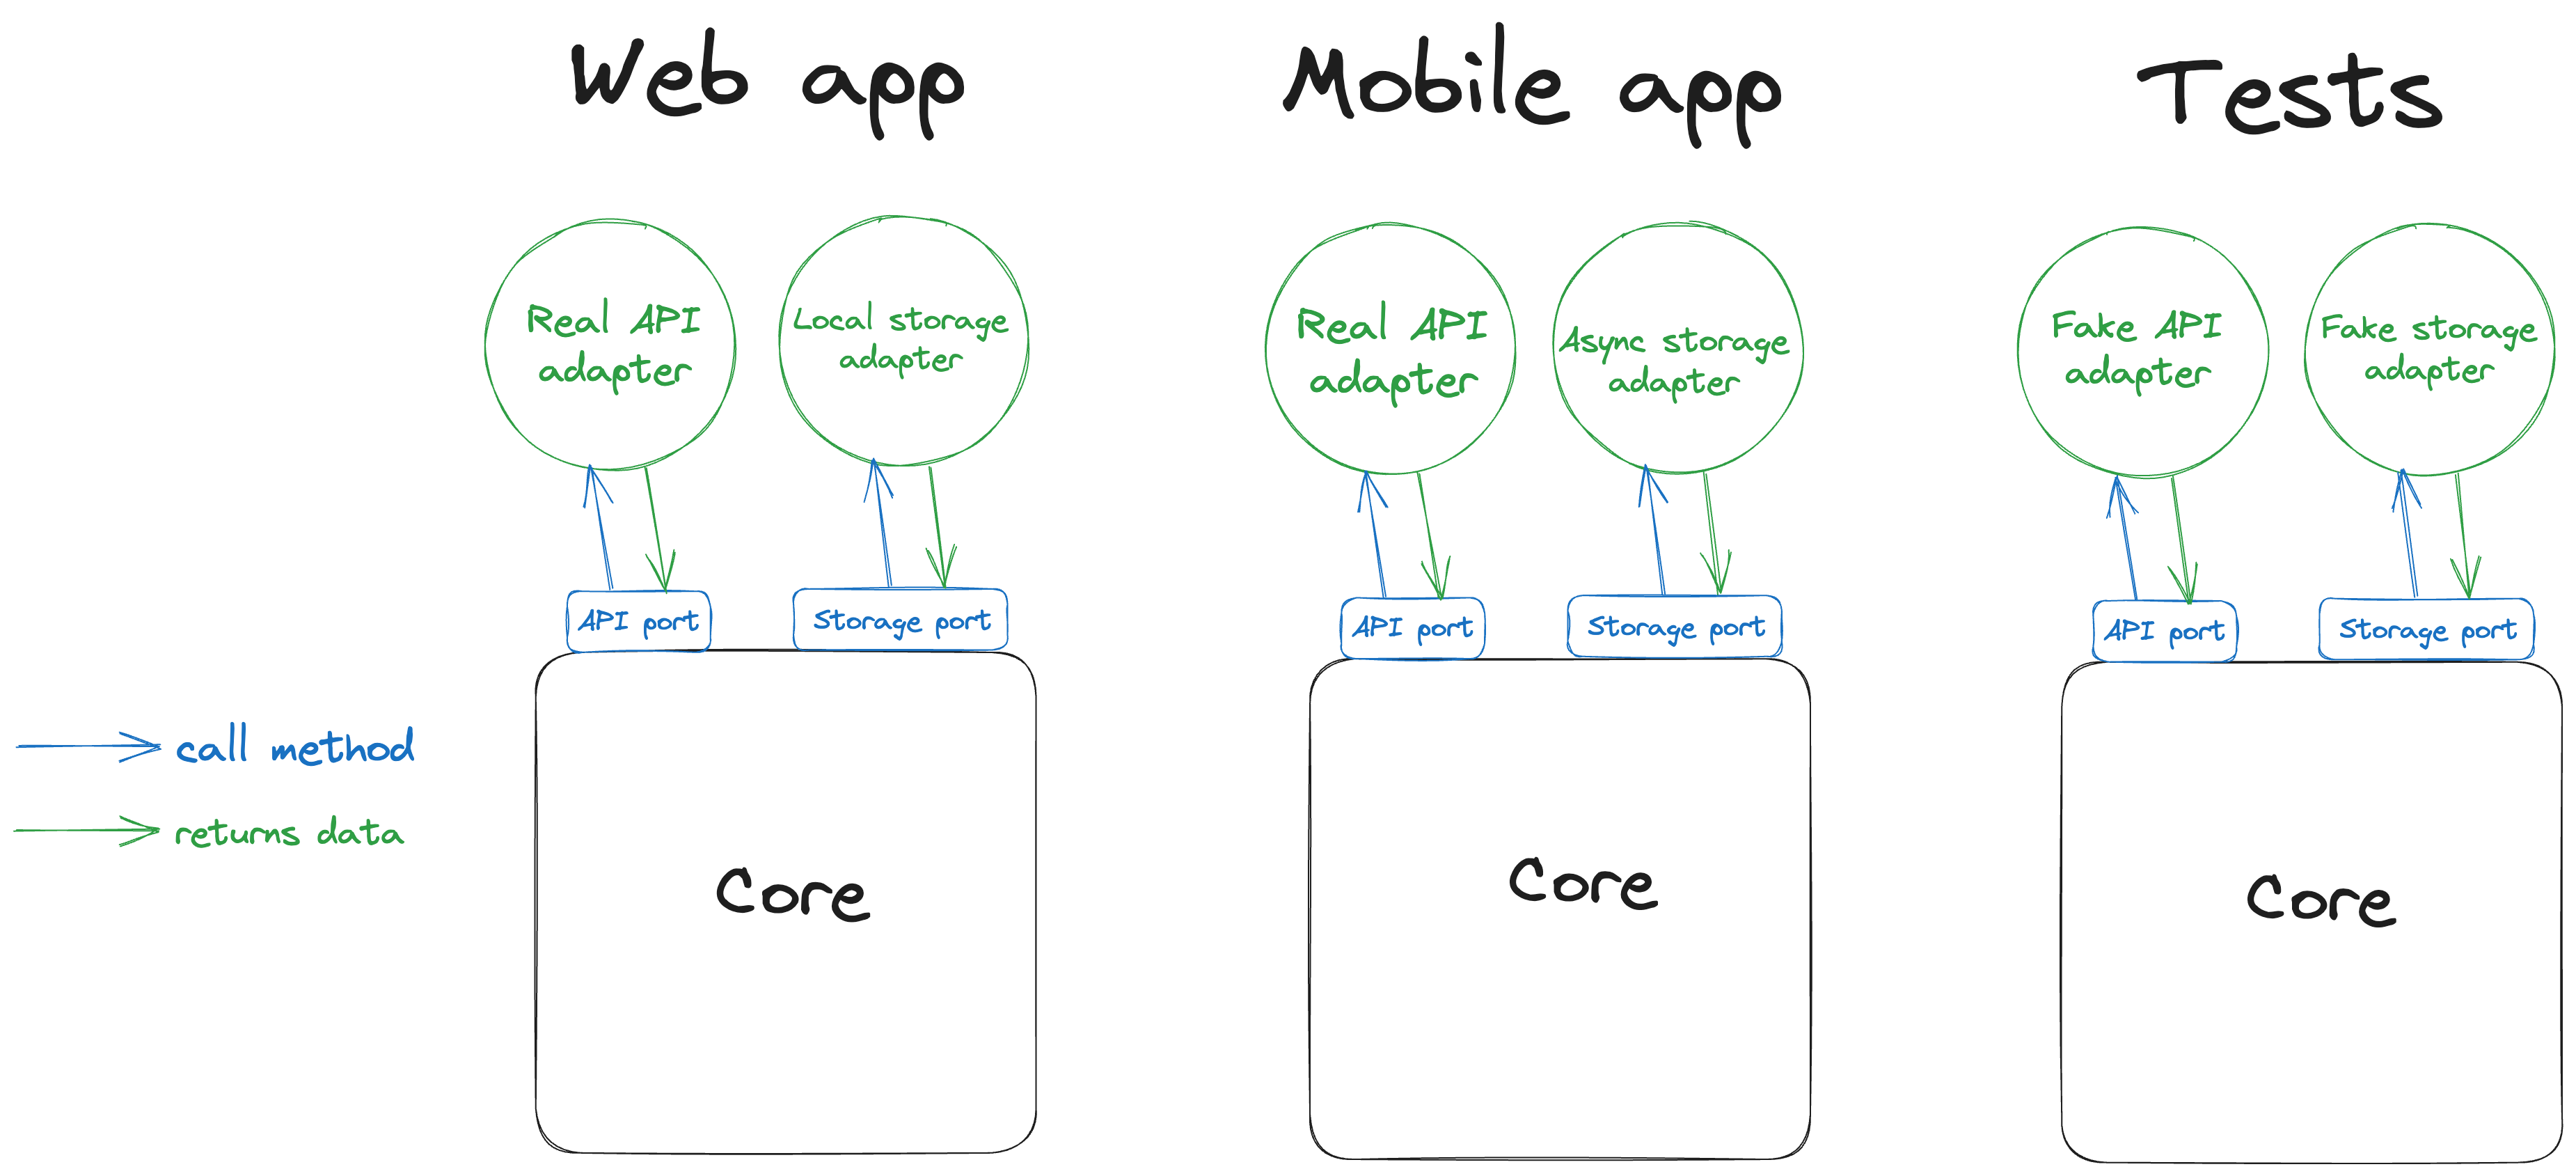
We will inject the dependencies we need in the core of our app, and then inject the core in the provider or test its behavior directly with jest

Concrete example
A port also named a gateway has its own contract, coded as an interface, each signature must define the parameter types and the return type of each methods.
Example
export interface UserApiGateway {
  login(email: string, password: string): Promise<{ token: string }>
  getMe(): Promise<{ firstName: string; lastName: string }>
}
So any implementation of it must respect the contract to be an adapter
Here we can code the real adapter, that can be used in the app in production
export interface RealUserApiAdapter implements UserApiGateway {
  async login(email: string, password: string) {
    return (await axios.post('https://my-api/login', { email, password })).data
  }
  async getMe() {
    return (await axios.get('https://my-api/get/me')).data
  }
}
Note that we used Axios here but we can create as many adapters we want with fetch or any other library, so the day we need to change a library, we will just have to code a new adapter and plug it to the app
We can even create a fake adapter for our tests later
export interface FakeUserApiAdapter implements UserApiGateway {
  async login(email: string, password: string) {
    if (email === "admin@azot.dev" && password === "MyP4ssw0rd") {
      return { token: 'my-super-token' }
    }
    throw new Error('Failed to log in the user')
  }
  async getMe() {
    return { firstName: "Xavier", lastName: "Le Cunff" }
  }
}
How to plug it to the app
Create an interface that list all the dependencies needed by your app
interface Dependencies {
  userApi: UserApiGateway
  storage: StorageGateway
  // ... any other dependency
}
Add the dependencies to the core
export const Core = createCortexFactory<Dependencies>()(services);
Instantiate the core with the dependencies needed, we can see that we just need to change the storage adapter (few lines of code) to make our app compatible with all Javascript framework
For a React Native app
    <CortexProvider coreInstance={new Core({ userApi: new RealUserApiAdapter(), storage: new AsyncStorageAdapter() })}>
      <App />
    </CortexProvider>
For a React app
    <CortexProvider coreInstance={new Core({ userApi: new RealUserApiAdapter(),storage: new LocalStorageAdapter() })}>
      <App />
    </CortexProvider>
For an Electron app
    <CortexProvider coreInstance={new Core({ userApi: new RealUserApiAdapter(), storage: new ElectronStorageAdapter() })}>
      <App />
    </CortexProvider>
How to use it ?
In the services, through this.dependencies, you will get the typescript autocompletion:
type State = { firstName: string; lastName: string } | null

export class UserService extends Service<State> {
  static initialState: State = null;

  async login(email: string, password: string) {
    try {
      const token = await this.dependencies.userApi.login(email, password)
      this.dependencies.baseApi.setToken(token) // normally the token is injected letting the next call be authenticated
      const user = await this.dependencies.userApi.getMe()
      this.state.set(user)
      this.getService('app').setIsLoggedIn(true)
    } catch (e) {
      this.store.loginForm.error.set("The email or the password seem to be incorrect")
    }
  }

  logout() {
    this.dependencies.baseApi.unsetToken()
    this.state.set(null)
    this.store.app.isLoggedIn(false)
  }
 }
Tests
You can inject the dependency you want in your tests
describe('login', () => {
  let core: InstanceType<Core>;

  beforeEach(() => {
    core = new Core({userApi: new FakeUserApiAdapter()})
  })

  describe('login', () => {
    it('should set the user if the credentials are okay', async () => {
      await core.getService('user').login("admin@azot.dev", "MyP4ssw0rd");
      expect(core.store.user.firstName.get()).toBe('Xavier')
      expect(core.store.user.lastName.get()).toBe('Le Cunff')
    })

    it('should be logged in if the credentials are okay', async () => {
      await core.getService('user').login("admin@azot.dev", "MyP4ssw0rd");
      expect(core.store.app.isLoggedIn.get()).toBe(true)
    })
  })

  /// ... rest of your tests here
})
Conlusion
With this approach we append a bit more complexity because the adapters can be inconvenient to write, but we get an app that can run on any device and be easily testable. You can also write your API and other dependencies as services, but your app will be harder to test and won't be considered as coded in clean architecture anymore.
Cortex comes with few gateways and adapters ready to use, so a project can be quick to start. You can either extends from Cortex gateways and adapters or submit a pull request if your adding or modifications are generic enough